Creating Tickets
A ticket is a unit of work (a bug, feature request, or task) that you want a clanker to research, plan, and execute. Tickets can come from different places: the web UI, the Chrome extension, Slack, an external integration (MCP, Shortcut, Jira, GitHub, custom webhook etc.). You can also configure a scheduled claw task to run individual tasks on a schedule which allows you to use agent harnesses to scan vulnerabilities or keep your dependencies up to date.
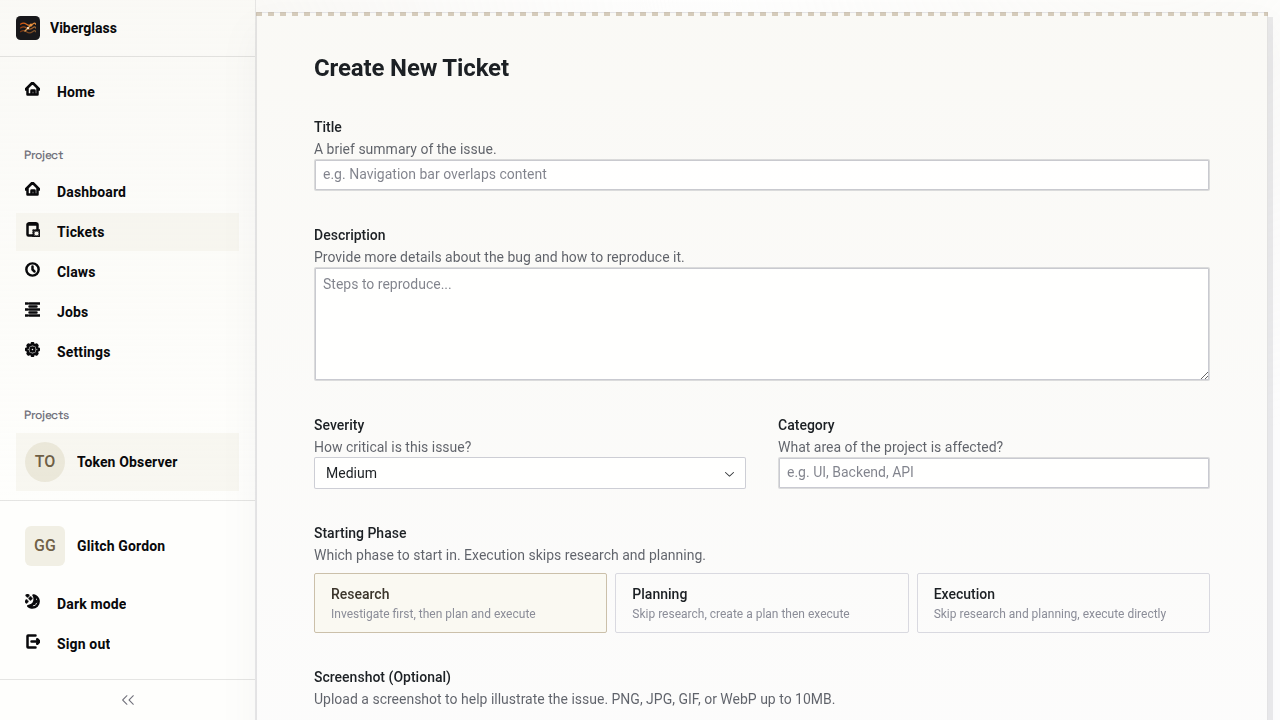
From the web UI
-
Open the project that should own the ticket.
-
Click Create Ticket on the project dashboard or from the Tickets page.
-
Fill in the form:
- Title — a brief summary of the issue (e.g. "Navigation bar overlaps content").
- Description — the long-form description, including reproduction steps, expected behaviour, observed behaviour, and any relevant context.
- Severity —
Low,Medium,High, orCritical. Defaults toMedium. - Category — a free-text area tag (e.g.
UI,Backend,API). The dashboard groups tickets by category. - Starting Phase — choose where the ticket starts:
- Research — investigate first, then plan and execute. The default and the recommended path for unclear or unfamiliar bugs.
- Planning — skip research, jump straight to designing the fix. Use this when the problem is well-understood.
- Execution — skip both research and planning. Use this only for tiny, mechanical changes you trust the agent to do unsupervised.
- Screenshot (optional) — upload a PNG, JPG, GIF, or WebP up to 10 MB to illustrate the issue.
- Screen Recording (optional) — upload an MP4, WebM, or QuickTime video up to 10 MB to demonstrate the bug.
-
Click Create Ticket. The ticket lands in the project's ticket list and a clanker is dispatched immediately if auto-fix is enabled (or as soon as you trigger it manually otherwise).
From the Chrome extension
The Chrome extension captures bugs where they happen. Click the Viberglass icon in your toolbar to open the capture popup. Viberglass automatically collects console errors, network failures, and browser environment details from the current tab. You can then annotate the screenshot, attach additional description and information, and submit the ticket directly. See Chrome Extension for the full workflow.
From Slack
If your workspace has the Slack chat connected to Viberglass, type /viberator in any channel to open the Create Ticket modal. The modal asks for:
- The project the ticket belongs to.
- The clanker that should pick it up.
- The starting mode (research, planning, or execution — same meaning as Starting Phase in the web form).
- A short message describing the work.
When you submit, Viberglass creates the ticket, launches an agent session, and starts a Slack thread on the message you submitted from. Every assistant response, status update, and approval prompt arrives in that thread, and any reply you write in the thread is forwarded back to the agent.
For the full Slack workflow — including how to approve plans and revise output from inside Slack — see Slack.
From external integrations
When a project is linked to an external ticketing or SCM integration, Viberglass can ingest tickets automatically. See Integrations for more details.
External tickets carry the source system in their metadata. The ticket detail page shows it as Ticket system: github (or slack, shortcut, custom, etc.) so you can tell at a glance where the work came from.
From scheduled claws
Claws don't create tickets, but they do produce jobs that look and behave the same way: an agent runs against your repo, follows a prompt, and reports back. See Claws for the full picture.
Statuses
A ticket's Status field reflects where it is in the workflow:
- Open — created but no phase has finished yet, or the workflow hasn't been started.
- In Progress — at least one phase is currently running an agent.
- In Review — a phase document is awaiting your approval.
- Resolved — the Execution phase finished and a pull request was opened (or the work was completed and accepted).
The status field is separate from the Workflow Phase, which tells you which phase you're in (research, planning, or execution). A ticket can be In Progress during planning or In Review because the planning document is awaiting approval — both are valid combinations.
See Ticket Lifecycle for the phase flow, revisions, and approvals. For Slack-based ticket creation, see Slack.